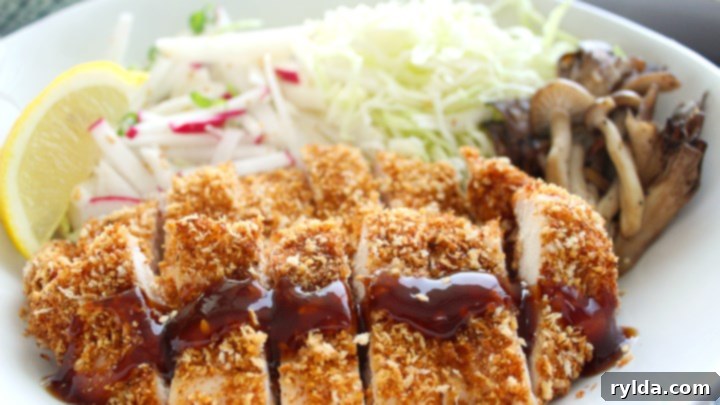
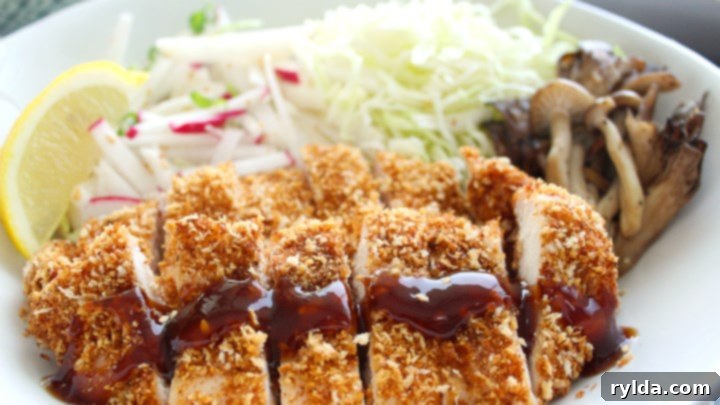
Easy & Authentic Chicken Katsu Recipe: Crispy Japanese Comfort Food
Chicken Katsu is a beloved classic in Japanese cuisine, renowned for its irresistible combination of tender, juicy chicken encased in a golden, crispy panko crust. This dish is not just a meal; it’s a culinary experience that brings comfort and delight to any dining table. Often served with fluffy white rice and a tangy Tonkatsu sauce, it’s a complete and satisfying meal that your entire family will absolutely love.
Our recipe for Chicken Katsu is designed for home cooks, focusing on simplicity without compromising on authenticity or flavor. We guide you through each step, from preparing the chicken breasts to achieving that perfect golden-brown crispness that makes katsu so famous. With a quick prep time and an even quicker cook time, this dish is an ideal choice for busy weeknights or a special weekend treat when you crave something both delicious and comforting.
Forget bland and boring chicken dinners; Chicken Katsu elevates humble chicken breasts into a culinary masterpiece. The secret lies in the panko breadcrumbs, which are distinctly lighter and flakier than traditional breadcrumbs, resulting in an incredibly airy and crunchy coating that seals in the chicken’s moisture. Get ready to impress your family and friends with this easy-to-make, incredibly flavorful Japanese staple!

Chicken Katsu
4.3 from 4 votes
Prep Time:
15 minutes
Cook Time:
10 minutes
Servings:
4
I was incredibly excited to try making this classic dish of Chicken Katsu. The mere thought of tender, succulent chicken, lovingly breaded in light, airy panko, and then fried to a magnificent golden perfection, sent my taste buds into eager anticipation. What made this recipe even more appealing was its promise of a quick prep time and cook time, making it the perfect choice for a satisfying and convenient meal that doesn’t compromise on flavor or texture. This truly is comfort food at its finest, easy enough for a weeknight but special enough for any occasion.
Ingredients
-
4
skinless, boneless chicken breast halves – pounded to 1/2 inch thickness for even cooking -
salt and freshly ground black pepper to taste
-
2
tablespoons
all-purpose flour (for coating) -
1
large egg, lightly beaten (for dredging) -
1
cup
panko bread crumbs (for extra crispiness) -
1
cup
vegetable oil, canola oil, or other neutral oil for frying, or as needed (enough to cover 1/4 inch of the pan)
Directions
- Prepare the Chicken: Season both sides of the pounded chicken breasts generously with salt and pepper. Set up a breading station: place the all-purpose flour in one shallow dish, the beaten egg in a second shallow dish, and the panko bread crumbs in a third shallow dish. First, dredge each chicken breast in the flour, ensuring it’s fully coated, then gently shake off any excess flour. Next, dip the floured chicken into the beaten egg, allowing any extra egg to drip off. Finally, press the chicken firmly into the panko crumbs, making sure both sides are thoroughly coated. The panko should adhere well, creating a thick, even layer.
- Fry to Perfection: Heat approximately 1/4 inch of oil in a large, heavy-bottomed skillet (cast iron works wonderfully for even heat distribution) over medium-high heat. To test if the oil is ready, drop a pinch of panko into the pan; it should sizzle immediately. Carefully place the breaded chicken pieces into the hot oil, being careful not to overcrowd the pan (cook in batches if necessary). Fry for about 3 to 4 minutes per side, or until the chicken is cooked through, and the panko coating is a beautiful golden brown and wonderfully crispy. Once cooked, transfer the Chicken Katsu to a wire rack set over a baking sheet to drain any excess oil and keep it crisp.
Why This Chicken Katsu Recipe is a Must-Try
With great enthusiasm, I gathered the ingredients and meticulously prepared the chicken breasts, ensuring each one was perfectly pounded and then coated in the remarkable crispy panko breadcrumbs. The preparation process itself was straightforward and enjoyable, setting the stage for a truly delightful meal. As the chicken began to fry in the hot oil, a wonderfully inviting aroma filled my kitchen, intensifying the anticipation of the delicious Japanese comfort food that awaited me and my family.
The moment the Chicken Katsu was cooked to golden perfection, I carefully removed it from the skillet. The sight of the beautifully bronzed, textured crust was a testament to the simplicity and effectiveness of the recipe. I then plated it alongside a generous serving of steaming, fluffy white rice, which provides the perfect neutral base to complement the rich flavors of the katsu. The golden crust of the chicken hinted at the satisfying crunch that would accompany each and every bite.
Indeed, with every mouthful, I savored the incredibly tender and juicy chicken, perfectly complemented by the exquisitely crispy and flavorful breading. The combination of textures—the delicate succulence of the chicken and the robust crunch of the panko—was truly delightful and immensely satisfying. This dish is a testament to the power of simple ingredients transformed into something extraordinary. The natural flavors of the chicken were allowed to shine through, while the unique panko breadcrumbs added an irresistible, light crispness that truly elevates the experience. It was not just a meal; it was a complete, delicious, and incredibly satisfying culinary experience that left me and my family utterly content and already looking forward to making it again.
Pro Tips for Making Perfect Chicken Katsu
- Pound Evenly: Pounding the chicken breasts to a uniform 1/2-inch thickness is crucial. This ensures the chicken cooks evenly and quickly, preventing some parts from drying out while others are still cooking. It also helps the breading adhere better. Use a meat mallet or a heavy rolling pin.
- Season Generously: Don’t be shy with the salt and pepper on the chicken. The seasoning here is important as it’s the primary flavor for the chicken itself.
- The Breading Station: Set up your flour, egg, and panko in a logical assembly line to make the breading process smooth and mess-free. Use one hand for the dry ingredients (flour, panko) and the other for the wet (egg) to keep things cleaner.
- Press the Panko: When coating the chicken in panko, press firmly to ensure a thick, even layer. This creates that iconic crispy crust that Chicken Katsu is famous for and prevents the breading from falling off during frying.
- Oil Temperature is Key: Ensure your oil is heated to the correct temperature (around 350-375°F or 175-190°C). If the oil isn’t hot enough, the katsu will absorb too much oil and become greasy. If it’s too hot, the breading will burn before the chicken cooks through. A simple test is to drop a few panko crumbs in; they should sizzle gently and turn golden brown within seconds.
- Don’t Overcrowd the Pan: Frying in batches is essential. Overcrowding the skillet will drop the oil temperature, leading to greasy, less crispy katsu. Give each piece enough space to fry properly.
- Drain Excess Oil: After frying, transfer the cooked katsu to a wire rack placed over a baking sheet or paper towels. This allows air circulation, keeping the katsu crispy and preventing it from becoming soggy from residual oil.
Serving Suggestions for a Complete Japanese Meal
Chicken Katsu is fantastic on its own, but it truly shines as part of a larger, balanced meal. Here are some popular and delicious ways to serve your homemade katsu:
- Fluffy White Rice: A classic pairing, the plain rice provides a perfect canvas for the flavorful chicken and sauce.
- Tonkatsu Sauce: This tangy, sweet, and savory Japanese BBQ sauce is a non-negotiable accompaniment for katsu. You can find it in most Asian grocery stores or make a quick homemade version.
- Shredded Cabbage: A mound of thinly shredded raw cabbage is traditionally served alongside katsu. Its fresh, crisp texture and slightly bitter notes cut through the richness of the fried chicken, offering a refreshing contrast.
- Miso Soup: A warm bowl of savory miso soup makes for a comforting side dish.
- Pickled Ginger (Gari): A small side of pickled ginger can cleanse the palate between bites.
- Lemon Wedges: A squeeze of fresh lemon juice over the hot katsu adds a bright, zesty note that enhances the flavors.
- Japanese Potato Salad: A creamy, slightly sweet potato salad offers another comforting side option.
- Katsu Curry: For a heartier meal, serve your Chicken Katsu sliced over a bed of rice and smothered in a rich Japanese curry sauce.
- Katsudon: Transform leftovers into Katsudon! Slice the katsu, simmer it in a dashi-based sauce with onions, and top with an egg, then serve over rice.
Variations and Storage Tips
Explore Katsu Variations
While chicken katsu is incredibly popular, the “katsu” technique (meat cutlet, breaded, and fried) can be applied to other proteins:
- Pork Katsu (Tonkatsu): The original and perhaps most famous katsu, made with tender pork loin or fillet. Follow the same breading and frying method.
- Shrimp Katsu: Delicious for seafood lovers, offering a delightful crunch with succulent shrimp inside.
- Tofu Katsu: A vegetarian-friendly option, using firm or extra-firm tofu, pressed to remove excess water before breading.
Healthier Alternatives
If you’re looking to reduce the amount of oil, Chicken Katsu can also be prepared using alternative methods:
- Baked Chicken Katsu: Lightly spray the breaded chicken with cooking oil and bake at 400°F (200°C) for 20-25 minutes, flipping halfway, until golden and cooked through. It won’t be quite as crispy as fried but is a great lighter option.
- Air Fryer Chicken Katsu: Preheat your air fryer to 375°F (190°C). Lightly spray the breaded chicken with oil and air fry for 12-15 minutes, flipping halfway, until golden brown and crispy.
Storing and Reheating Leftovers
Leftover Chicken Katsu is a real treat, and can be enjoyed in various ways. To keep it at its best:
- Storage: Allow the katsu to cool completely, then store it in an airtight container in the refrigerator for up to 3-4 days.
- Reheating for Crispiness: To restore its crispiness, avoid the microwave. Reheat katsu in a toaster oven, conventional oven (at 350°F / 175°C for 10-15 minutes), or an air fryer until heated through and crisp again.
- Creative Leftovers: Leftover katsu is perfect for sandwiches, salads, or even sliced into strips for a quick bento box lunch.
Conclusion: Your New Favorite Japanese Dish
Chicken Katsu is more than just a recipe; it’s an invitation to explore the delightful flavors and textures of Japanese home cooking. This easy-to-follow guide ensures that you can create a restaurant-quality dish right in your own kitchen, with minimal fuss and maximum flavor. The tender chicken, the satisfying crunch of the panko, and the versatility of serving options make it a winner every time.
Whether you’re new to Japanese cuisine or a long-time fan, this homemade Chicken Katsu will quickly earn a spot as a regular in your meal rotation. It’s a testament to how simple ingredients, prepared with care, can yield extraordinary results. So, gather your ingredients, follow these steps, and prepare to indulge in a truly irresistible meal that promises comfort, crispiness, and incredible taste. Enjoy the journey of making and savoring this fantastic Japanese classic!
